3/19/20

Featured Fawnatics - Challenge 72

I did a thing! Competition was pretty stiff and I'm so excited my card was featured on the Lawn Fawnatics Challenge 72! (Bottom right corner) 

This is my favorite Lawn Fawnatics challenge "Inspired by a Book, Movie or Song! You could also include TV, plays and musicals..." 

I made two cards for this challenge. My first card was inspired by Stranger Things. There is a scene when the character Eleven and her friends are playing chicken with a van and she flips it over their heads with her telekinesis. I thought it was so cool! I thought of this for a card last time Lawn Fawnatics did this challenge, but didn't get it done. This time around, I had a new design idea in my head and brought it to life!

I made a 4" x 8" card so I can could create forced perspective. The challenge was getting the stitched hillside boarders lined up perfectly since they are only 5.5" long. I modified the Bicycle Built for You characters and bikes by masking and drawing in details to make them look like the cast from Stranger Things. You can't really tell, but two of the bikes have banana seats! I added the sentiment from their Yeti or Not set to finish off the card.


My second card was inspired by my favorite Harry Potter book "Goblet of Fire". Again I made a long 4" x 8" card so I could go for forced perspective again. I tried to include items from each task. We have the dragon, golden egg, and Firebolt. I have a merman I modified to have ropey hair. Finally, the goblet (I didn't want to create a hedge maze). I included a small portion of the forbidden forest with a whomping willow and the castle at the top.


I used the tree from the Lawn Fawn set Critters on the Savanna and masked off the leaves. Instead I drew in knobs at the end of the branches and vines standing straight up. My husband tried to tell me I was wrong and they should be hanging. Don't worry, I proved I was right with a quick google image search! I don't know why he still questions me... 

The whole idea a I had with this was to show Harry saying thanks to Hermione for helping him out and sticking by him. Spoiler Alert! Ron was a little b***h for the first half of the tournament. :-) 

I ended up altering their uniforms since I don't have a ton of black markers and you don't have been able to tell what was what. I tried to make it look like they were sitting with their robes on. I'm not super happy with the ground. I ended up gluing the paper down before I had a chance to do some ink blending on it. Oh, well!

I used so many different stamp sets on these cards and if you want to see the list here it is. 
Lawn FawnStitched Hillside Borders, Mermaid For You, Bicycle Built for You, Village Shops, Happy Village, Yeti or Not, Critters on the Savanna, Jessie's ABCs, Toadally Awesome, Life is Good, You Are Sublime, and Sandy Beach Accents
(Blogger was yelling at me I had too many characters in the "labels" so I took them out.)

This challenge was so much fun to participate in! I still have another idea for a Harry Potter card and may just have to finish it on my own... 

3/20/19

Farm Birthday Card

For a farm girl niece, I created this fun twist panel pop-up card using Karen Burniston's Twist Panel Pop Up kit.
You can make a card like this too! I started with a red card stock for the base of the card. I used my background gingham stamp to make the three black and white checked strips. You can find tutorials online for creating the twist pop up card, if you don't have it. 

On the front of the card I used some Distressed Ink to create the sky and grass look. By placing a stickie not you can create a sharp line dividing the colors. I used Lawn Fawn's Scripty Happy die (I wish they had a matching birthday die) with a little wreath die.

Inside, I used the Twist Panel Pop Up die kit and cut negative and positive portions of Stitched Hillside  dies to make a sky and ground for my farm friends. I stacked the two colors on top of each other to get a perfect match. I used Critters on the Farm stamps and colored with copic markers.  to create the back and white checker paper I used Gingham Backdrops stamp. 

This scene can be modified for to anything you already have. I hope you enjoyed!

3/13/19

Irwin Birthday Card

I had been toying with the idea of creating a birthday card since I saw the Kindred Stamps set G'Day. I finally had to make this happen since it was Steve Irwin's actually birthday! (I may have finished it technically at 3am the next day) I tried very hard to crop off the hat on the G'day character but, I just couldn't get it to look right so I switched to Lawn Fawn. I used the Bicycle Built for You set to make the people look like they are wrestling a croc. I think it turned out pretty cute! 
I struggled with where to put Terri as I couldn't put her too close since it would look like her head was on Steve's butt. It worked out well to use the Critters Down Under stamp set for the croc. It is a little longer to give me more space to work with for the croc wrestlers. I borrow the log and cattails from Totally Awesome and a grass tuft is from Critters in the Jungle.

For the front message, CRICKEY!, I used the Jessie's ABCs. I grabbed the Wild for You set and used it to make the inside sentiment. 

I'll give the G'Day set another try now that I have multiliner markers to complete character modifications! 

3/7/19

Dead Dudes Birthday Card

Today, I am sharing a fun little card I created for my niece's birthday. A little backstory for this card is she introduced me this ridiculous video "Carl Poppa" by Bad Lip Reading. WARNING - It will get stuck in our head! 


So, I came up with the idea to make her a birthday card inspired by the video using the Kindred Stamps Surviving Zombies set and the Lawn Fawn stamp set Let's Play. I created my own stencil to color the ground and ski with distressed inks. I colored in the items with copic markers and used a little Gelly roll pen for some highlights. The center zombie is on a mini wobble spring. Lastly, I printed my sentiments using Word and some neat fonts I've downloaded.

Here is the finished product with the inside message and the envelope peeking out.


Don't worry folks she's 14 years old and this is way cuter than anyone in that video! Don't let dead dudes ruin your day and I hope you enjoyed.

Jiggy jar jar doo!

11/22/18

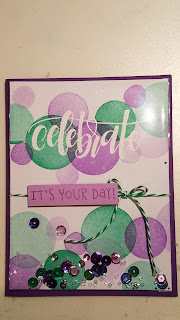
You're the Sweetest & Celebrate (Strawberries & Dots)

I made plans to get together with a couple of friends and assemble some cards. We each came up with two designs and prepped six of each card. The plan was for everyone to go home with two copies of each card. I wanted to challenge myself with a total different style than I'm used to. It still incorporated coloring (which I love), but it had tons of fluff/jewels/layers to it, too!

I had a bunch of doilies from the baking isle/dollar store and found one that was about the right size for a card. With my Stampin Up ovals I die cut the girl and the background with the scallop style. I used my Lawn Fawn Gingham Backdrop stamp for the green background pattern. Add some ribbon, velum butterfly, and some jewels to finish it off. I think it turned out great for stepping outside my usual style!

The other design was inspired by a card I had created in a Stamp Camp with some local Stampin Up demonstrators (below). 
I wanted to see if I could recreate the card with some stamps I already had... I bought cellophane bags on Amazon and have had them for a LONG time and finally decided I was going to do it.

The original card was peach and yellow with matching sequins (like everything Stampin Up - super matchy matchy!). Looking at my ink and sequins inventory I settled on a green and purple color scheme. I had a pack of purple and green sequins I had planned to use for a mermaid themed card. (It appears I may have a shopping problem...) I used my Paper Smoochies Mirror Blocks circle stamps and another small circle stamp I had to achieve the dots.
I added a little bit of clear beads to the sequins for a little extra height/dimension. I just so happened to have some baking twine that was close enough in color. Little secret - the dollar store had three different sets of three colors! That is, what? $0.33 each? WIN!!! :) 

Since I didn't have the Stampin Up "Celebrate" embossing folder, I decided to heat emboss my sentiment instead and I think it worked well. Just a tip - be sure to let your circles dry! The embossing powder will try to cling to any wet spots if you do it all in one sitting.

I hope you enjoyed and have the urge to try doing one of these on your own!

10/7/18

Mermaid Twist Panel Pop Up Card

My daycare provider's daughter is in synchronized swimming. For a birthday card I immediately thought she needed a mermaid card! 

My inspiration for this card was Mona's yellow box card. I tried to make as may items yellow as I could and carried that throughout the card. 


The most challenging part of making twisting popup cards is the front cover! You want the wow factor to be inside, so struggle to come up with a simple design for the front that won't steal the show (and all the hard work put into the inside)! The small image in the collage is the cover and I think it ended up pretty sweet. I did a inked embossing folder for the background and punched a hole in it.

I used Lawn Fawn stamp sets for most of the characters/critters. The background was blended using Tim Holtz Distressed Ink. Everything was colored using Copic markers (yay, coloring!). 

I really liked the added elements hanging off the center twisting popup. If you try doing this be careful everything stays within the card when it's closed!

I hope you love it as much as I do :). It was hard to let this one go... Now, sit down and try doing it on your own!

9/1/18

Music Exploding Box Card


My new mission: provide all nieces and nephews exploding box cards for their 16th birthday! (3 down, 17 to go!) Thank goodness they are fairly spread out. I may get roped into doing this for my own boys too...

These bad boys are very time consuming. I try to make fun interactive items on all flaps. There are 3 layers to this box and 4 flaps, which equals 12 parts to essentially make mini cards/decorate. Phew! 

Interactive parts include:
  • Waterfall
  • Lift-a-flap
  • Spinners
  • Pockets
  • Fold outs
  • Sliders

I also include small gifts and usually a $5-10 bill depending on the gifts already included.

Small gifts incorporated:
  • Nail stickers
  • Enamel pins
  • Magnetic bookmarks
  • Mini Post-it Notes


Below is an image of one I created a while back for a niece who loves music and plays clarinet. 

I used this template as a guide on how I was going to go about making these out of 12" x 12" pages. Be sure to get paper that is 2 sided. It makes it look fancier when the back of the flaps have color or design on it, instead of just white.

If you make a little pocket to include mini Post-it Notes be sure to plan on having that on the top most flap (when it's laying open). It doesn't lay flat if you do it in the middle layer or the bottom layer. I learned that the hard way... 

I hope I inspired you to go out there and create your own exploding box card. It's time consuming, but super fun to watch everyone Oooo and Ahhh over it.