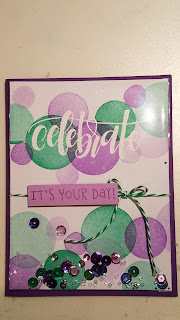
I made plans to get together with a couple of friends and assemble some cards. We each came up with two designs and prepped six of each card. The plan was for everyone to go home with two copies of each card. I wanted to challenge myself with a total different style than I'm used to. It still incorporated coloring (which I love), but it had tons of fluff/jewels/layers to it, too!
I had a bunch of doilies from the baking isle/dollar store and found one that was about the right size for a card. With my Stampin Up ovals I die cut the girl and the background with the scallop style. I used my Lawn Fawn Gingham Backdrop stamp for the green background pattern. Add some ribbon, velum butterfly, and some jewels to finish it off. I think it turned out great for stepping outside my usual style!
The other design was inspired by a card I had created in a Stamp Camp with some local Stampin Up demonstrators (below).
I wanted to see if I could recreate the card with some stamps I already had... I bought cellophane bags on Amazon and have had them for a LONG time and finally decided I was going to do it.
The original card was peach and yellow with matching sequins (like everything Stampin Up - super matchy matchy!). Looking at my ink and sequins inventory I settled on a green and purple color scheme. I had a pack of purple and green sequins I had planned to use for a mermaid themed card. (It appears I may have a shopping problem...) I used my Paper Smoochies Mirror Blocks circle stamps and another small circle stamp I had to achieve the dots.
I added a little bit of clear beads to the sequins for a little extra height/dimension. I just so happened to have some baking twine that was close enough in color. Little secret - the dollar store had three different sets of three colors! That is, what? $0.33 each? WIN!!! :)
Since I didn't have the Stampin Up "Celebrate" embossing folder, I decided to heat emboss my sentiment instead and I think it worked well. Just a tip - be sure to let your circles dry! The embossing powder will try to cling to any wet spots if you do it all in one sitting.
I hope you enjoyed and have the urge to try doing one of these on your own!


